
Self-host Syncthing
An always-on Syncthing node: a hub and off-site copy for your devices.
Shelley handles the setup. About 10 minutes.
Prefer a terminal?
curl -fsSL https://exe-staging.dev/deploy/syncthing/prompt.txt | ssh exe.dev new --prompt=/dev/stdinSyncthing keeps folders in sync between your computers and phones, directly, with no cloud account in the middle. Its catch is that two devices have to be online at the same time to sync. A laptop that's asleep when your phone takes photos gets them only when both are awake together.
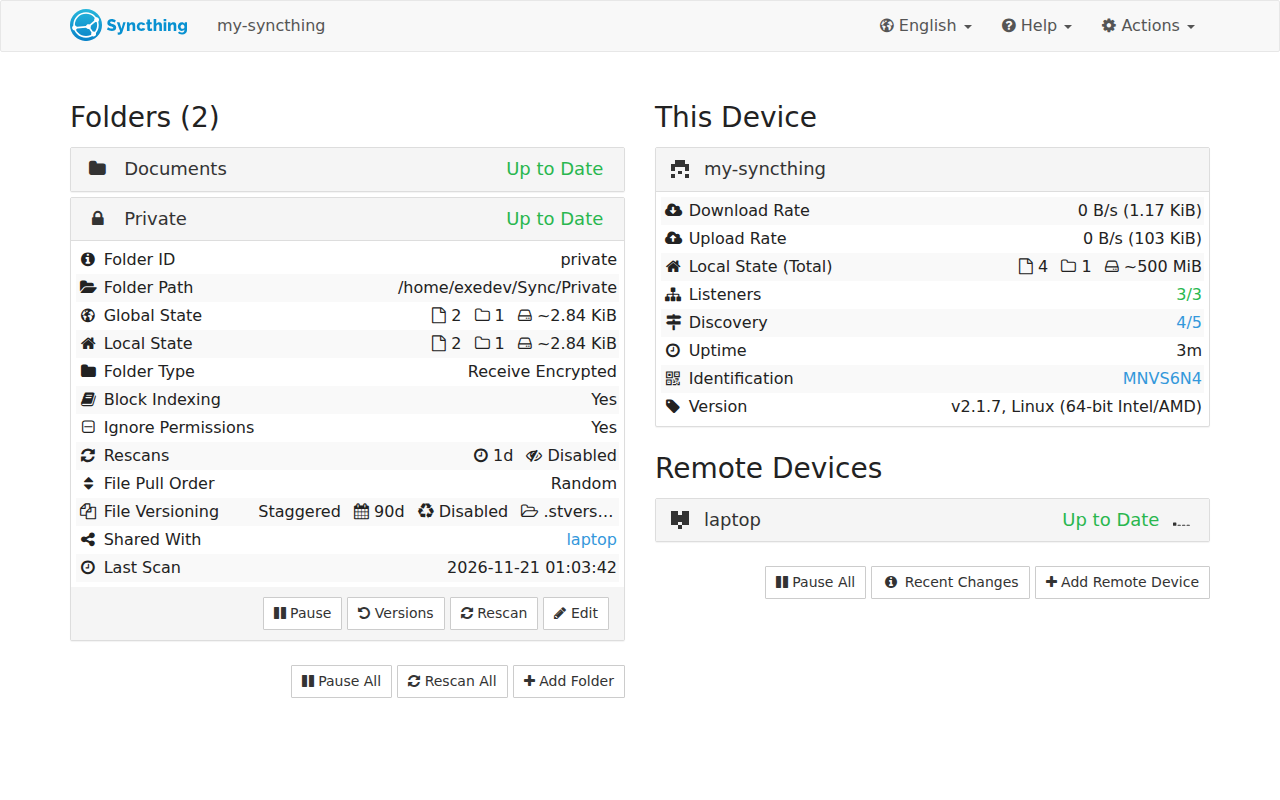
An exe.dev VM fixes that. It's a Syncthing device that is always on, with a real disk: every change reaches it as soon as one device is online, and reaches the others from it whenever they come back. It's also an off-site copy with old versions kept, and it can hold that copy encrypted, so the VM never sees your files. Its web GUI sits on a private port behind your exe.dev login.
What you get#
- Syncthing 2.x installed from its official apt repository, started at boot by systemd.
- The web GUI on a private port behind exe.dev login, with a GUI password saved in ~/syncthing/gui-password.
- New folders land in ~/Sync with staggered versioning (90 days) switched on.
- The VM's device ID, ready to add on your other devices.
- A copy of the device's identity and settings in ~/syncthing, for rebuilding the VM as the same device.
What's running, and where
https://my-syncthing.exe.xyz:8384/
The Syncthing web GUI and REST API, behind exe.dev login and its own password
Deploy with Shelley#
Click Deploy and Shelley will set up Syncthing on a new VM, then check that it works. No config-file wrangling required.
Prefer a terminal?
curl -fsSL \
  https://exe-staging.dev/deploy/syncthing/prompt.txt \
  | ssh exe.dev new --prompt=/dev/stdin
What Shelley is told
Set up Syncthing on this VM by following the exe.dev recipe at https://exe-staging.dev/deploy/syncthing.md?via=deploy from top to bottom.

The recipe's example VM name is my-syncthing. This VM's name is the output of `hostname`: use it wherever the recipe writes my-syncthing. Skip the step that creates the VM; you are on it.

You are done when all of these are true. Check each one yourself:
- Syncthing 2.x installed from its official apt repository, started at boot by systemd.
- The web GUI on a private port behind exe.dev login, with a GUI password saved in ~/syncthing/gui-password.
- New folders land in ~/Sync with staggered versioning (90 days) switched on.
- The VM's device ID, ready to add on your other devices.
- A copy of the device's identity and settings in ~/syncthing, for rebuilding the VM as the same device.

Read the whole recipe, including the closed details. For initial setup,
follow "Install by hand" first, skipping VM creation and SSH. The
walkthrough at the top is for the owner afterwards.
Work as exedev. Never overwrite an existing ~/.local/state/syncthing or
~/syncthing/gui-password. Don't add devices or folders, don't set up
Tailscale, and don't run Restore or Update.
Verify syncthing@exedev.service is enabled and active, /rest/noauth/health
answers OK on localhost:8384, the GUI address is 0.0.0.0:8384, and the
folder defaults (path ~/Sync, staggered versioning) are set. Do not reboot.
Never paste the GUI password into the chat; say it's in
~/syncthing/gui-password. Finish by giving the owner the VM's device ID
and pointing them to "Connect your first device".

Finish with the URLs I should open.
Also at /deploy/syncthing/prompt.txt. The recipe it follows is /deploy/syncthing.md.
Open the Syncthing GUI#
Open https://my-syncthing.exe.xyz:8384/ and sign in to exe.dev if asked.
Syncthing then asks for its own login: the user is exedev, and the
password is on the VM. On your computer:
ssh my-syncthing.exe.xyz cat syncthing/gui-password
The first time, Syncthing asks whether to send anonymous usage reports; either answer is fine. Port 8384 is reachable only by you and people you share the VM with, so the password is a second lock, not the only one.
Connect your first device#
Install Syncthing on your computer from syncthing.net/downloads if you haven't. Then pair it with the VM. On your computer, get the VM's device ID:
ssh my-syncthing.exe.xyz syncthing device-id
- In your computer's Syncthing, click Add Remote Device, paste the ID,
and name it
my-syncthing. Save. - Within a minute, the VM's GUI shows that your computer wants to connect.
Click Add Device. On the Sharing tab, tick Auto Accept:
any folder this device shares will be created on the VM, in
~/Sync, without another click. Save. - Back on your computer, edit a folder, open its Sharing tab, tick
my-syncthing, and save.
The folder appears on the VM in ~/Sync/<folder label> and fills up.
Add your other devices the same way: pair each with the VM, and share the
same folders with it. They don't need to know about each other; the VM
passes changes along. Check from your computer:
ssh my-syncthing.exe.xyz ls ~/Sync
Tip
Pairing two devices that already sync with each other? Keep sharing between them too. Syncthing uses whichever devices are online, and the VM is just the one that always is.
Keep your files unreadable on the VM#
Syncthing can treat a device as untrusted: you give a folder a password when you share it with that device, and it receives only encrypted data. File names, contents and sizes (roughly) are hidden; the VM can still keep, version and pass on the encrypted copy. Your devices keep the plaintext.
On each of your devices, when sharing a folder with the VM, type a password
in the field next to my-syncthing on the folder's Sharing tab
(If untrusted, enter encryption password). Use the same password for
that folder on every device. With Auto Accept on, the VM creates the
folder as Receive Encrypted by itself. On the VM it looks like this:
ls ~/Sync/Private
E.syncthing-enc I.syncthing-enc M.syncthing-enc
To make it hard to share plaintext by mistake, also edit the VM's device entry on your computers: Advanced → Untrusted. Syncthing then refuses to share any folder with it without a password. Ticking it stops sharing every folder that has no password with the VM; we saw a plain folder quietly drop off the VM that way, so set the passwords first.
To get your files back from the encrypted copy, say after losing a laptop, copy the folder off the VM and decrypt it on any machine with Syncthing. On your computer:
rsync -a my-syncthing.exe.xyz:Sync/Private/ ./private-encrypted/
FOLDER_PASSWORD='your folder password' syncthing decrypt ./private-encrypted --to ./private
A wrong password fails with authentication failed. Keep the password
somewhere other than the devices that use it (a password manager): without
it, the VM's copy is unreadable to you too.
Note
Encrypted folders can't be opened or shared on the VM, so it can't serve them to a web app or back them up by file name. That's the point; use plain folders for anything the VM itself should work with.
How your devices reach the VM#
exe.dev's proxy carries only HTTP(S), so nothing on the internet can open a connection to the VM's sync port, 22000. Syncthing copes; it doesn't need both sides to accept connections. We paired the VM with devices on other networks and watched the connections:
- Through a relay. Within seconds, both ends met at one of Syncthing's public relays. This always worked. Relays forward data they can't read (the TLS session is between your devices), but they're run by volunteers and some limit speed. Our 500 MB test file crossed in about 38 seconds (about 13 MB/s) between two exe.dev VMs.
- Directly over QUIC. The VM sits behind a NAT that keeps its port
(Syncthing reports
Port restricted NAT), so it can punch through to a device behind an ordinary home router. Against a machine on another network, Syncthing switched from the relay to a direct QUIC connection about ten seconds after connecting. It won't work with strict (symmetric) NATs, common on phone networks. - The VM dials you. If a device accepts connections on 22000 (a port forward, or UPnP on your router), the VM connects to it over TCP directly.
See the connection type for each device on its row in the GUI, or on the VM:
syncthing cli show connections | jq '.connections[] | {type, address}'
relay-client/relay-server is a relay, quic-client/quic-server a
direct connection. Relays are fine for documents and everyday photos. For
a first upload of hundreds of gigabytes, or if you'd rather your traffic
and IP addresses never touch Syncthing's discovery servers and relays, use
Tailscale.
Faster and private: Tailscale#
On a Tailscale network, the VM and your devices reach each other directly over WireGuard, and Syncthing uses plain TCP on port 22000 between tailnet addresses: no relays, no Syncthing discovery, and no port forwarding. Your devices need Tailscale running to sync.
Join the VM to your tailnet with exe.dev's
Tailscale integration, which uses
workload identity, so no Tailscale auth key ever sits on the VM: set it up
once in the exe.dev and Tailscale consoles, attach it to my-syncthing,
and run the "Join your Tailscale network" commands from that page on the
VM, first enabling the daemon (Tailscale is preinstalled):
sudo systemctl enable --now tailscaled
Without the integration, sudo tailscale up --hostname=$(hostname) and
the login link it prints work too. Then point each side at the other's
tailnet name. On each of your devices, edit the my-syncthing device,
and on the Advanced tab set Addresses to:
tcp://my-syncthing:22000, dynamic
On the VM, do the same for each device, with its tailnet name (shown by
tailscale status). dynamic keeps relays as a fallback; leave it out,
and turn off global discovery and relays on the VM, to sync only over
Tailscale:
syncthing cli config options global-ann-enabled set false
syncthing cli config options relays-enabled set false
Note
We tested the relay and QUIC paths above, but not this one end to end: it needs your own tailnet. The Syncthing settings are the same ones any device uses for a fixed address.
Keep old versions#
The install switches on staggered file versioning for every new folder
on the VM: when a file is changed or deleted on another device, the VM
moves its old copy into the folder's .stversions directory and keeps
versions for 90 days, thinning them out as they age (one every 30 seconds
for the first hour, one per hour for the first day, one per day for the
first month, one per week after that). We
deleted a 200 MB file on one device; it disappeared from the VM's folder
and reappeared, date-stamped, in .stversions.
To restore a file, click the folder in the VM's GUI, then Versions, or
copy it out of .stversions by hand. Old versions count against your disk,
so for folders that churn (build output, VM images), pick a shorter
Maximum Age under Edit → File Versioning, or exclude them with
Ignore Patterns.
Disk space and cost#
The VM holds a full copy of every folder you share with it, plus old
versions. A new VM's disk is 25 GB, and the system takes about 5 GB of it.
Check what's left on the VM with df -h /. To grow it, on your computer:
ssh exe.dev resize my-syncthing --disk=200GB
then on the VM run sudo resize2fs "$(findmnt -no SOURCE /)". Disks only
grow; you can't shrink one.
Your plan includes disk for all your VMs together (100 GB per 2 vCPU on Personal) and 200 GB of outbound bandwidth a month. Disk beyond that, and bandwidth beyond that, are billed as usage. Uploads to the VM are free; the VM sending a folder to a new laptop, or a change to each of three devices, is outbound. Syncthing needs little CPU or memory, so it can share a small VM with other light services.
Syncthing stops downloading into a folder when free space drops below that folder's Edit → Advanced → Minimum Free Disk Space (1% of the disk by default), and shows an out-of-space error instead of filling the disk. Raise it if other things on the VM need room.
Back it up#
The VM is an off-site copy of your folders, but the VM itself can be lost too. Two things matter:
-
Its identity and settings. The device key and certificate are its device ID: restore them and your devices reconnect to the rebuilt VM as if nothing happened. The install saved a copy in
~/syncthing; make a fresh one after adding devices or folders, and copy it off. On your computer:ssh my-syncthing.exe.xyz 'tar -C ~/.local/state -czf - syncthing/config.xml syncthing/key.pem syncthing/cert.pem' > syncthing-identity.tar.gzKeep it private: the key lets anyone pose as this device.
-
The files. Your devices have them, so a rebuilt VM fills up again from them, at the cost of re-sending everything. To keep a copy that doesn't depend on your devices, use exe.dev's VM backups (a preview), which copy the whole disk, incrementally, to your own S3 bucket.
To rebuild from the identity backup, see Restore.
Script it with the REST API#
The GUI is a client of Syncthing's REST API,
which is useful for monitoring ("has the VM seen my laptop today?"). Port
8384 is private, so a script outside the VM needs two things: an exe.dev
VM token to get through the proxy, and
Syncthing's API key. On your computer, make the token (it prints one
starting with exe1.; add --exp=90d to have it expire):
ssh exe.dev ssh-key generate-api-key --vm=my-syncthing --label=syncthing-api
Get Syncthing's API key with ssh my-syncthing.exe.xyz syncthing cli config gui apikey get. Then, from the script's machine, with the token in
VM_TOKEN and the key in ST_KEY:
curl -s -H "X-Exedev-Authorization: Bearer $VM_TOKEN" -H "X-API-Key: $ST_KEY" \
  https://my-syncthing.exe.xyz:8384/rest/system/connections | jq '.connections'
Without the token, the proxy answers 401; without the API key, Syncthing
answers 403. Store both like passwords.
The nuts and bolts#
Happy clicking Deploy? You can stop here. These are the same setup steps Shelley follows, plus the maintenance commands for later. Tested with Syncthing 2.1.7 from the stable-v2 channel on Ubuntu 24.04, November 2026.
Install by hand
Create a VM#
On your computer (pick another name if my-syncthing is taken; add
--disk=100GB or more if you'll sync more than about 15 GB):
ssh exe.dev new --name=my-syncthing
ssh my-syncthing.exe.xyz
All remaining installation commands run on the VM, as exedev.
Install Syncthing#
From Syncthing's own apt repository, on the stable-v2 channel, which
follows Syncthing 2.x releases (usually the first Tuesday of each month).
The pin makes apt prefer it over Ubuntu's older package.
sudo mkdir -p /etc/apt/keyrings
sudo curl -fsSL -o /etc/apt/keyrings/syncthing-archive-keyring.gpg https://syncthing.net/release-key.gpg
echo "deb [signed-by=/etc/apt/keyrings/syncthing-archive-keyring.gpg] https://apt.syncthing.net/ syncthing stable-v2" | sudo tee /etc/apt/sources.list.d/syncthing.list
printf "Package: *\nPin: origin apt.syncthing.net\nPin-Priority: 990\n" | sudo tee /etc/apt/preferences.d/syncthing.pref
sudo apt-get update
sudo apt-get install -y syncthing
syncthing --version
Expect syncthing v2.1.7 or a later 2.x.
Make its identity and GUI password#
This creates the device key and settings in ~/.local/state/syncthing,
with a random GUI password saved to ~/syncthing/gui-password, and makes
the GUI listen on all interfaces so exe.dev's proxy can reach it. It won't
touch an existing setup.
mkdir -p ~/syncthing ~/Sync
if [ ! -f ~/.local/state/syncthing/config.xml ]; then
  (umask 077; openssl rand -base64 18 > ~/syncthing/gui-password)
  syncthing generate --gui-user=exedev --gui-password=- < ~/syncthing/gui-password
  sed -i 's|<address>127.0.0.1:8384</address>|<address>0.0.0.0:8384</address>|' ~/.local/state/syncthing/config.xml
fi
grep -o '<address>[^<]*:8384' ~/.local/state/syncthing/config.xml
syncthing device-id
Expect <address>0.0.0.0:8384 and the device ID. Syncthing skips its
Host-header check when the GUI isn't on localhost, so it works behind the
proxy as is; the password keeps it locked.
Give QUIC bigger buffers#
Syncthing's QUIC connections want larger UDP buffers than Ubuntu allows
(why). The
package ships a setting for that, applied at every boot, but not at
install; without it, Syncthing logs failed to sufficiently increase receive buffer size. Load it now:
sudo sysctl -p /usr/lib/sysctl.d/30-syncthing.conf
Expect net.core.rmem_max = 7340032 and the same for wmem_max.
Start it at boot#
The package ships syncthing@.service, a sandboxed system unit that runs
Syncthing as the user you name, from boot, with no login needed.
sudo systemctl enable --now syncthing@exedev.service
until curl -fs localhost:8384/rest/noauth/health; do sleep 1; done; echo
systemctl is-enabled syncthing@exedev.service
Expect "status": "OK" and enabled.
Set the folder defaults#
New folders, including those auto-accepted from your devices, go in
~/Sync and keep old versions for 90 days (7776000 seconds):
syncthing cli config defaults folder path set ~/Sync
syncthing cli config defaults folder versioning type set staggered
syncthing cli config defaults folder versioning params set maxAge 7776000
syncthing cli config defaults folder dump-json | jq '{path, versioning}'
Expect /home/exedev/Sync and staggered with maxAge 7776000.
Save the identity#
A first copy of the device key and settings, readable only by you:
(umask 077; tar -C ~/.local/state -czf ~/syncthing/identity-$(date -u +%Y%m%d).tar.gz syncthing/config.xml syncthing/key.pem syncthing/cert.pem)
ls -l ~/syncthing
Installation done. Open the GUI and continue with Connect your first device.
Back up and restore
Make an identity backup on your computer as in Back it up.
Restore onto a new VM#
This brings the VM back as the same device, so your devices reconnect to it without re-pairing; the folders then download again from them. Create the new VM and do Install Syncthing, then copy the backup over. On your computer:
scp syncthing-identity.tar.gz my-syncthing.exe.xyz:
On the VM, unpack it before Syncthing first starts (or stop it first with
sudo systemctl stop syncthing@exedev), then continue with
Give QUIC bigger buffers and
Start it at boot:
mkdir -p ~/.local/state ~/syncthing ~/Sync
(umask 077; tar -C ~/.local/state -xzf ~/syncthing-identity.tar.gz)
syncthing device-id
The device ID matches the old one. The GUI password is the old one too;
if you no longer have it, set a new one with
syncthing cli config gui password set 'new password' once it's running.
If the VM's name changed, update the address on your devices only if you
set one for Tailscale; Syncthing finds devices by ID.
Folders that were encrypted come back as Receive Encrypted and refill with encrypted data; the VM never needs their passwords.
Update Syncthing
The apt package can't update itself (it runs with [noupgrade]), so update
it with apt. Read the release notes
first, then on the VM:
sudo apt-get update
sudo apt-get install --only-upgrade -y syncthing
sudo systemctl restart syncthing@exedev
syncthing --version
The stable-v2 channel stays on 2.x. A future 3.x will get a new channel
name; switch to it only after reading its upgrade notes.
Something not working?
On the VM:
systemctl status syncthing@exedev --no-pager
journalctl -u syncthing@exedev -n 100 --no-pager
- The GUI says
Authentication Requiredand the password fails: use userexedevand the contents of~/syncthing/gui-password. Reset it withsyncthing cli config gui password set 'new password'. https://my-syncthing.exe.xyz:8384/doesn't load: checkgrep '<address>' ~/.local/state/syncthing/config.xmlsays0.0.0.0:8384. Change it in Actions → Settings → GUI if needed.- A device stays
Disconnected: check both sides added each other's device ID, and that the log showsEstablished secure connectionorConnection to ... closed. Both need to reach Syncthing's discovery servers, or have each other's address set by hand. - A folder you shared doesn't appear on the VM: without Auto Accept, the VM's GUI shows a prompt to add it. If the VM's device is marked Untrusted on your computer, folders without a password aren't shared at all.
- Sync is slow: check the connection type (above). A relay is the usual cause; try Tailscale.
Folder path missingor out-of-space errors: checkdf -h /and grow the disk as in Disk space and cost.failed to sufficiently increase receive buffer size: redo Give QUIC bigger buffers and restart.
Frequently asked questions#
Can a Syncthing node on exe.dev accept incoming connections?
Not on port 22000 from the internet: exe.dev's proxy carries only HTTP(S). It doesn't need to. The VM dials out to your devices, punches through NAT over QUIC when it can, and otherwise meets them at a Syncthing relay. In our tests every device connected; see How your devices reach the VM. For a direct, private path, put the VM on Tailscale.
Can the VM read my files?
Only if you let it. Share a folder with an encryption password and the VM stores it as Receive Encrypted: file names and contents are encrypted with a key only your devices have. We checked: a search of the VM's copy found no plaintext, and syncthing decrypt restored it with the password. See Keep your files unreadable on the VM.
Is Syncthing a backup?
Not by itself: it syncs deletions and mistakes too. The VM gets closer to one because new folders there keep old and deleted versions for 90 days, and because it's off-site. For a backup of the VM itself, use exe.dev's VM backups.
How much disk can I use, and what does it cost?
Your plan includes disk shared by all your VMs (100 GB per 2 vCPU on Personal) and 200 GB of outbound bandwidth a month; beyond that, disk and bandwidth are billed as usage. Upload to the VM is free; every byte the VM sends to a device counts as outbound. Syncthing itself is free (MPL-2.0).
Do I need the web GUI?
No. Everything it does is in syncthing cli and the REST API. The GUI is handy for accepting devices and folders, and it's behind exe.dev login, so it costs nothing to keep.
Can I use Syncthing on my phone with this?
Yes. The phone is one more device: pair it with the VM and share folders as above. Syncthing's own Android app was discontinued in 2024; use the community Syncthing-Fork on Android, and Synctrain or Möbius Sync on iPhone (see Syncthing's community apps). Phones are often behind strict NATs, so expect relays unless the phone runs Tailscale.
Published Nov 21, 2026 · Updated Nov 20, 2026 · tested end to end Nov 20, 2026 · Markdown · manifest.json · Something wrong? Tell us